You must use the JUnit 5 tests provided with the project-tests repository to determine if your project is meeting the required functionality. The suite of tests for each project are given by the Project#Test.java files in the src subdirectory. For example, the tests for Project 1 are provided by the Project1Test.java file.
Your code must pass these tests (using the remote testing procedure below) both to earn credit for the functionality portion of the project grade, and before every subsequent code review required after that point. For example, you will earn a grade for Project 1 Functionality for the first code release that passes the tests. However, to earn a grade for Project 1 Design, your code will need to pass the tests again before every code review until you pass the design requirements.
Each project also includes additional tests on top of the previous tests. For example, the project 3 tests still require that your code passes the project 1 and project 2 tests.
The provided tests only examine the final output of your code—you are still responsible for writing your own test code while developing and debugging your project.
You should place your test code in your own project repository, not the project-tests repository. You do not have access to commit and push to the test repository!
Run Configurations
It is possible to run Driver.java directly with your own command-line arguments using “Run Configurations” in Eclipse. This is useful for your own debugging, and testing out individual tests.
The tricky part is getting the paths right, since the test files are not in the same project as your code. On a Mac or Linux system, assuming your project repository and the project-tests repository are in the same parent folder, you can add the following command-line arguments:
-path "../../project-tests/SearchEngineTest/input/text/simple/hello.txt" -index hello.json
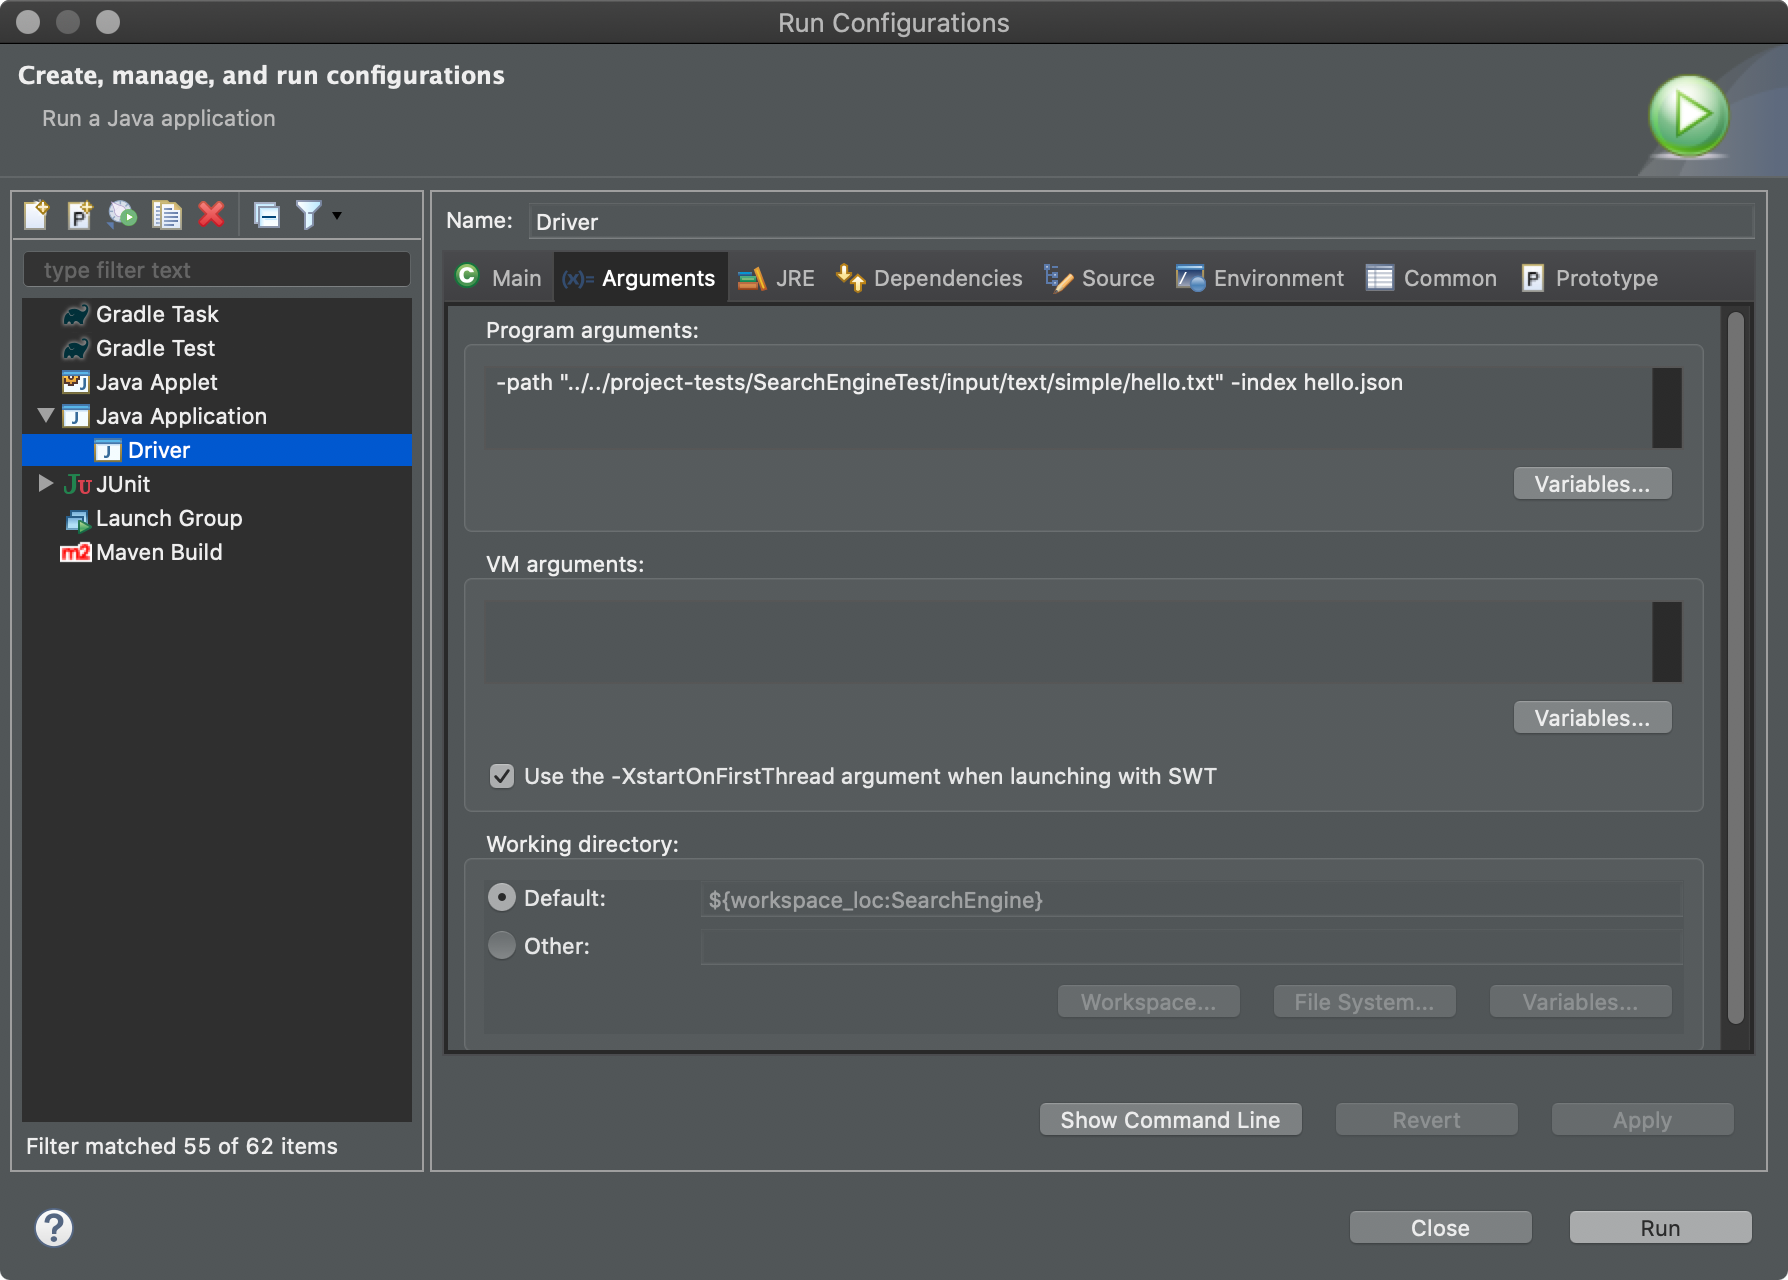
The quotation marks are required if there is a space in the path, otherwise they can be omitted. This should generate a file hello.json in the “SearchEngine” Eclipse project (in your repository, not the project-tests repository). Right-click and select “Refresh” if you do not see the file at first.
On a Windows system, the path separators / should be \ instead. The test code accounts for these differences, but the Eclipse compare view might not.
Testing Locally
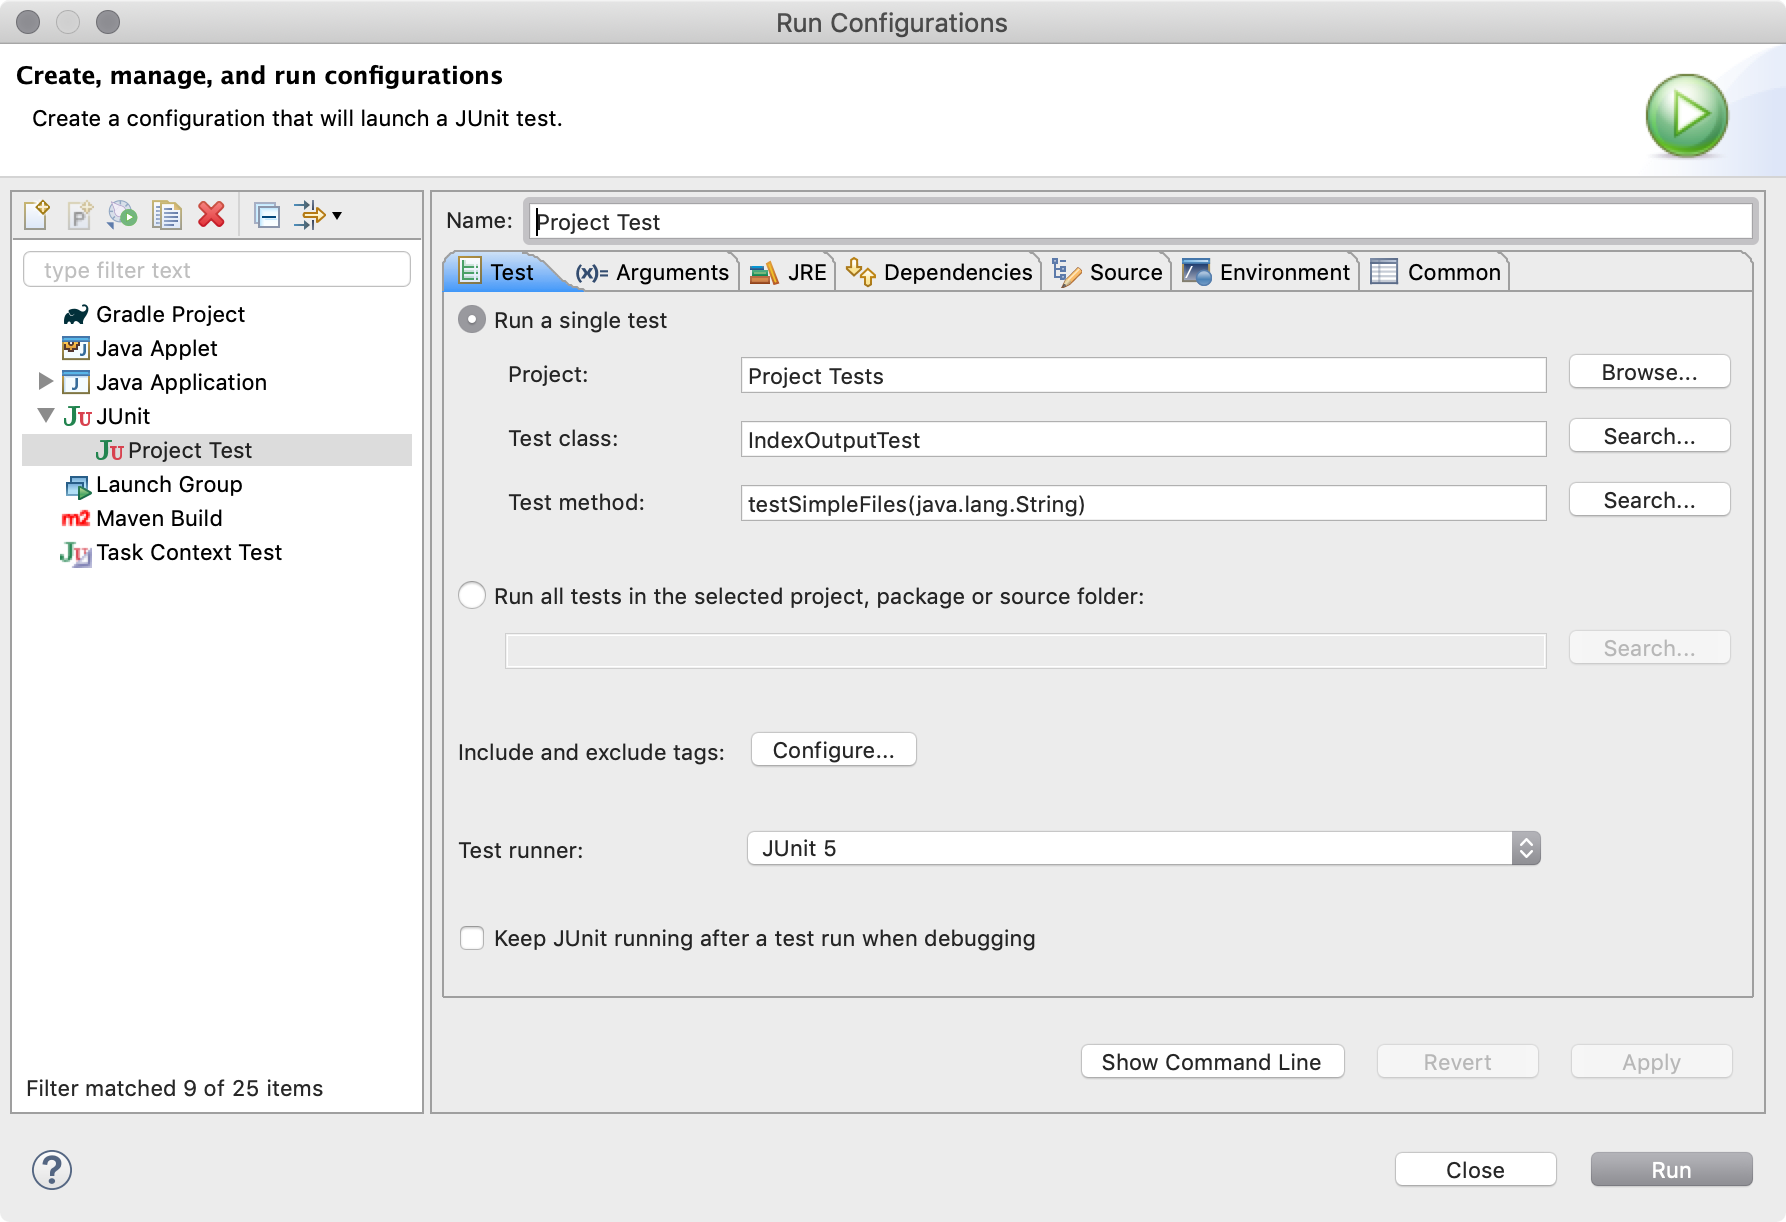
You should make sure you are passing the JUnit 5 tests locally before testing your code remotely. I also recommend you run only one test at a time at first, then groups of tests, and then the entire suite of tests only after you know you are passing each group individually. You can do this by right-clicking a test name or test class, and selecting “Run As” » “JUnit Test” from the menu. You can also manually configure the run configuration as well:
The output of each test provides additional information useful for debugging. For example:
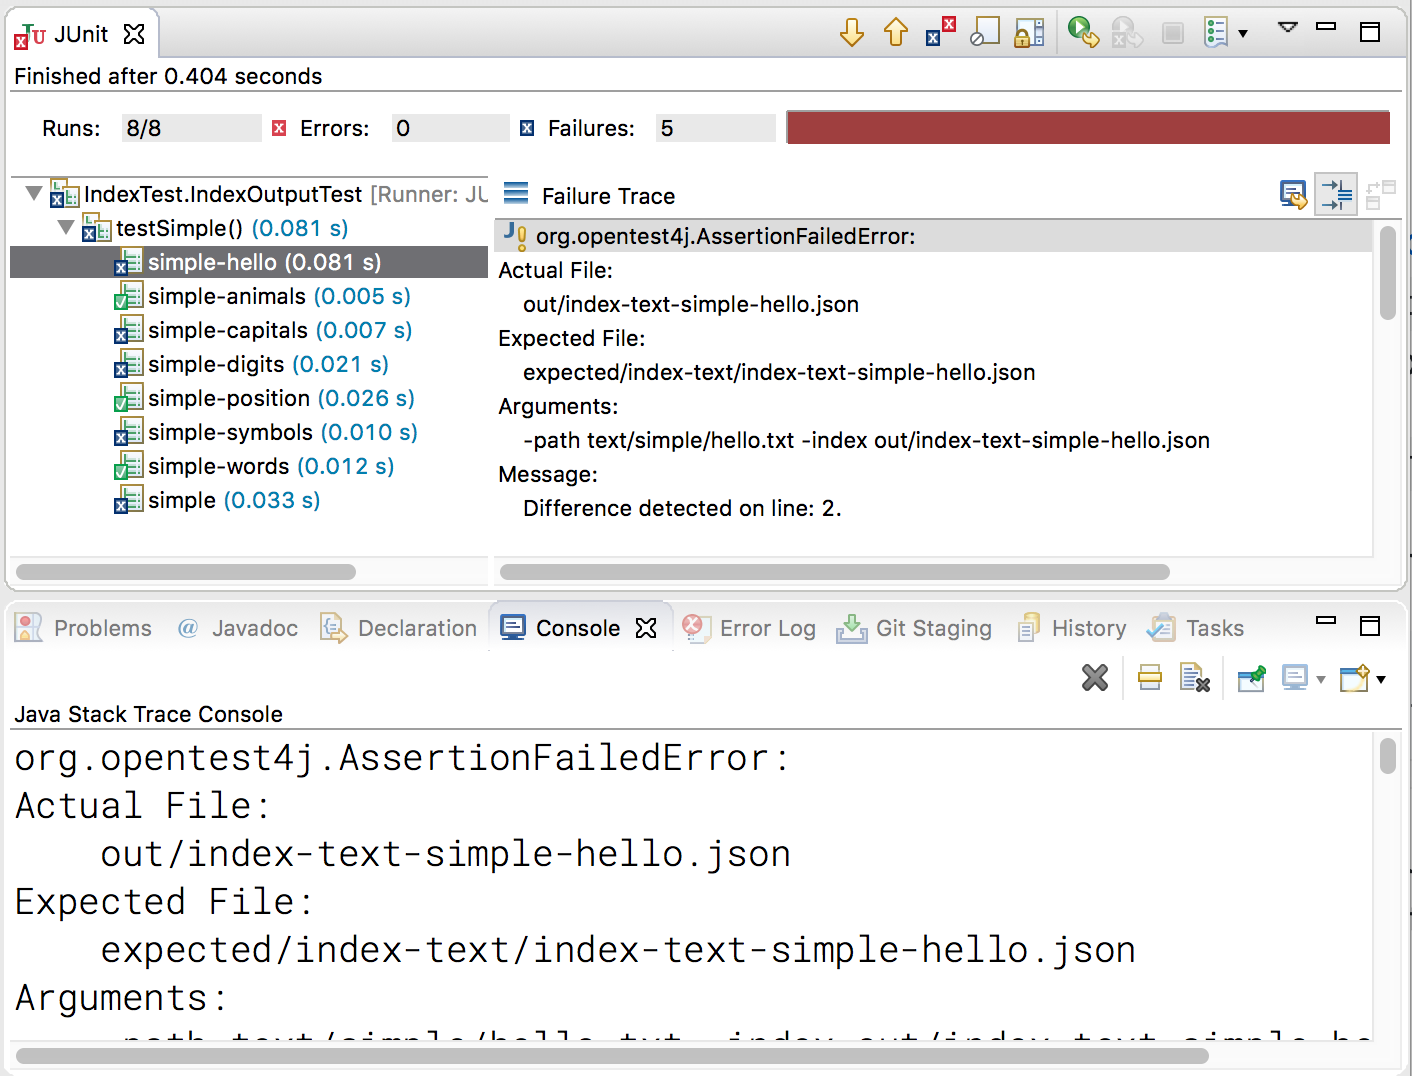
The full output, which can be copied to the console for easy copying/pasting using the  button, includes the following text:
Actual File:
    actual/index-text-simple-hello.json
Expected File:
    expected/index-text/index-text-simple-hello.json
Arguments:
    -path input/text/simple/hello.txt -index actual/index-text-simple-hello.json
Message:
    Difference detected on line: 2.
This gives the actual arguments passed to Driver by the test, the actual and expected files being compared, and where the first difference was detected. You can use the Compare Editor in Eclipse to compare the files side-by-side for debugging, or use the Run Configurations in Eclipse to enter the same arguments manually. Just keep in mind the paths need to be updated slightly since your Driver class is in a different folder than the project test code. So, for the above example, the appropriate command-line arguments to enter into the Driver run configuration would be:
-path "../../project-tests/SearchEngineTest/input/text/simple/hello.txt" -index actual/index-text-simple-hello.json
Then, the index-text-simple-hello.json will (hopefully) show up in the actual subdirectory of your project repository.
To save space, the tests automatically delete your output files if they match the expected output. Only output files for failing tests will be kept.
Testing Remotely
You must test your code remotely before you can earn credit for the functionality of your project and before you can sign up for a code review appointment.
This process begins by creating a release on Github. This will trigger the Github Action that verifies your project functionality.
Creating Releases
Creating releases will familiarize you with versioning your code. At this stage, your code will be considered pre-release versions until you pass the design requirements in code review.
-
After passing all of the tests locally and pushing your latest commits to Github, follow the Creating Releases steps to draft a new release of your project code on Github.
-
You must choose a “tag” or the version number you are going to assign to your code at this stage. Out in the “real world” you will likely use semantic versioning, which we will roughly mimic in class.
Specifically, you must name your release
v#.#.#where the first#is the project number (1, 2, 3, or 4), the second#is the number of code reviews you’ve had for that project, and the last#is the number of releases you have created since the last code review for that project.For example, your first release should be
v1.0.0because it is for project 1, you have not had any code reviews yet, and you have not had any releases yet. If your code does not pass the tests remotely, then you have to fix your code and re-release your project asv1.0.1since you now have 1 prior release. After your first code review, the next release will bev1.1.0(notice how the last number reset to 0).The release
v2.3.4means this release is for project 2, you have had 3 code reviews for project 2 so far, and this is the 4th release since your last code review of project 2. -
Make sure the “This is a pre-release” checkbox is selected:

You will unselect this checkbox for the final release of the project that passes the design requirements in code review.
-
Click the “Publish release” button. You can leave the title and description blank. You can also leave the binaries blank (this is where we would put executables or our own bundled jar files for production-ready releases). You can see a sample release on the template repository.
Generally, you should not delete releases even if they are not passing tests.
Verification Script
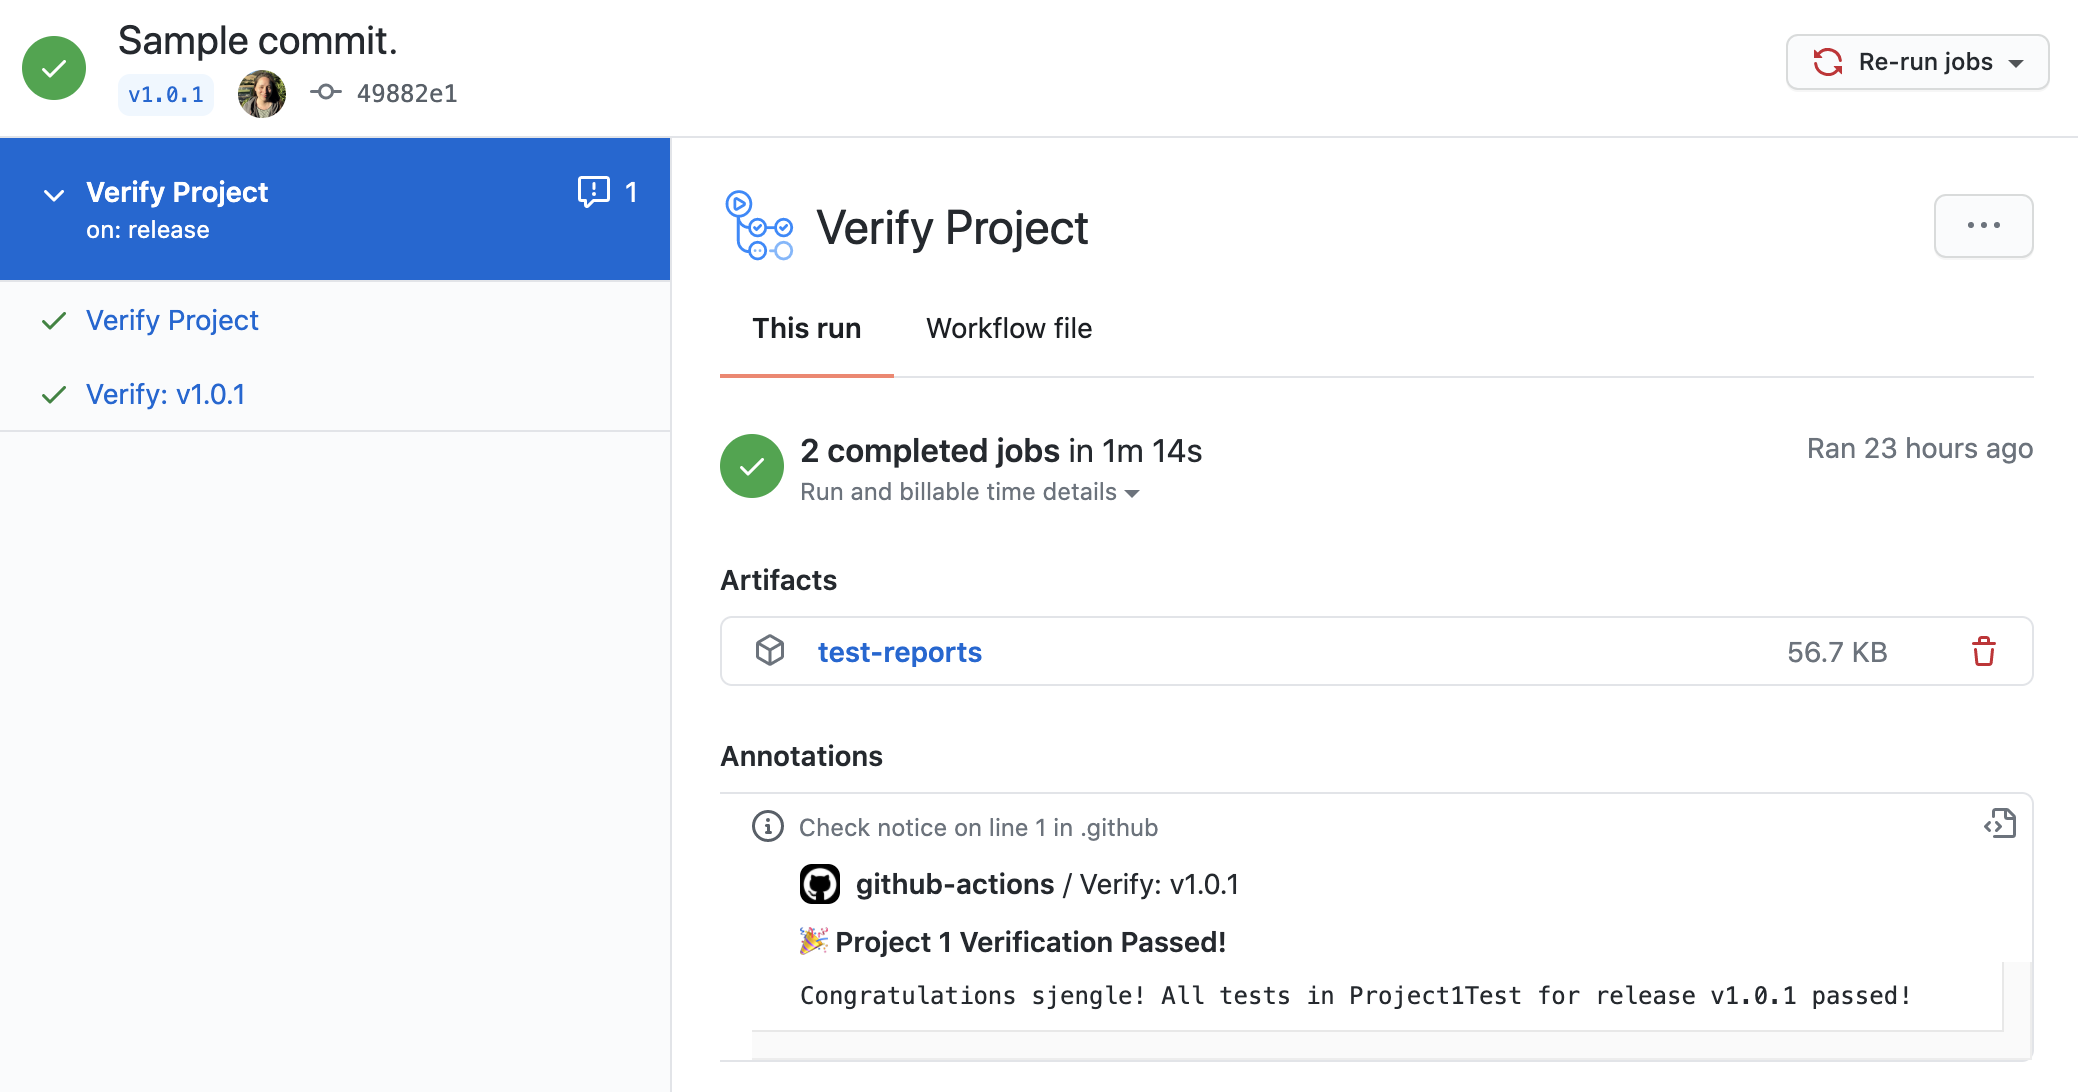
Once you have created a release, the verification script on Github Actions will automatically trigger.
You can find the results in the “Actions” tab on Github. Click on the release title to go to that run and view details. The first “Verify Project” link will summarize the results, the second will show details on each step in the run.
The action performs these steps:
-
It will check if you have the latest version of the verification action. If this fails, you will see an error similar to:
“Update your “/verify.yml” file from the attached artifact.”
“Your Github Action verify.yml is out of date.”To fix, see the Outdated Verification Script section below.
-
It will attempt to parse the version number. If the version number is not in the right format (
v#.#.#), then it will fail with an error message similar to:“The release tag is in an unexpected format.”
That includes having a lowercase
vat the start! If this happens, you will have to edit the release version or create a new release to continue. -
It will attempt to setup the environment for testing. This includes downloading your code, setting up Java, and setting up fresh test files. If this part fails, please post on Piazza with a link to the action run.
-
It will compile the project and test code. If this step fails, look at the log. Depending on your Eclipse configuration, the
javaccompiler might be using more strict compile settings when it comes to warnings and Javadoc than your system. -
It will run the tests associated with the release version. This might take awhile. You can watch as it progresses if you want.
-
It will generate a test report regardless of whether the tests passed or failed. These report files are available in the “Artifacts” section. See the Generated Reports section below for details.
-
It will output the result of the tests. If the tests succeed, you will see a message like:
If the tests failed, you will need to look at the logs and the reports to debug what happened. We can help as well if you post a link directly to the action run on Piazza!
If everything passes and you want credit for passing the functionality, follow the project grading steps to notify the teacher assistant.
Generated Reports
As long as the verification action was able to compile the code, it will generate reports from running the tests (regardless if the tests pass or fail). These can be helpful for debugging. There is an HTML version:
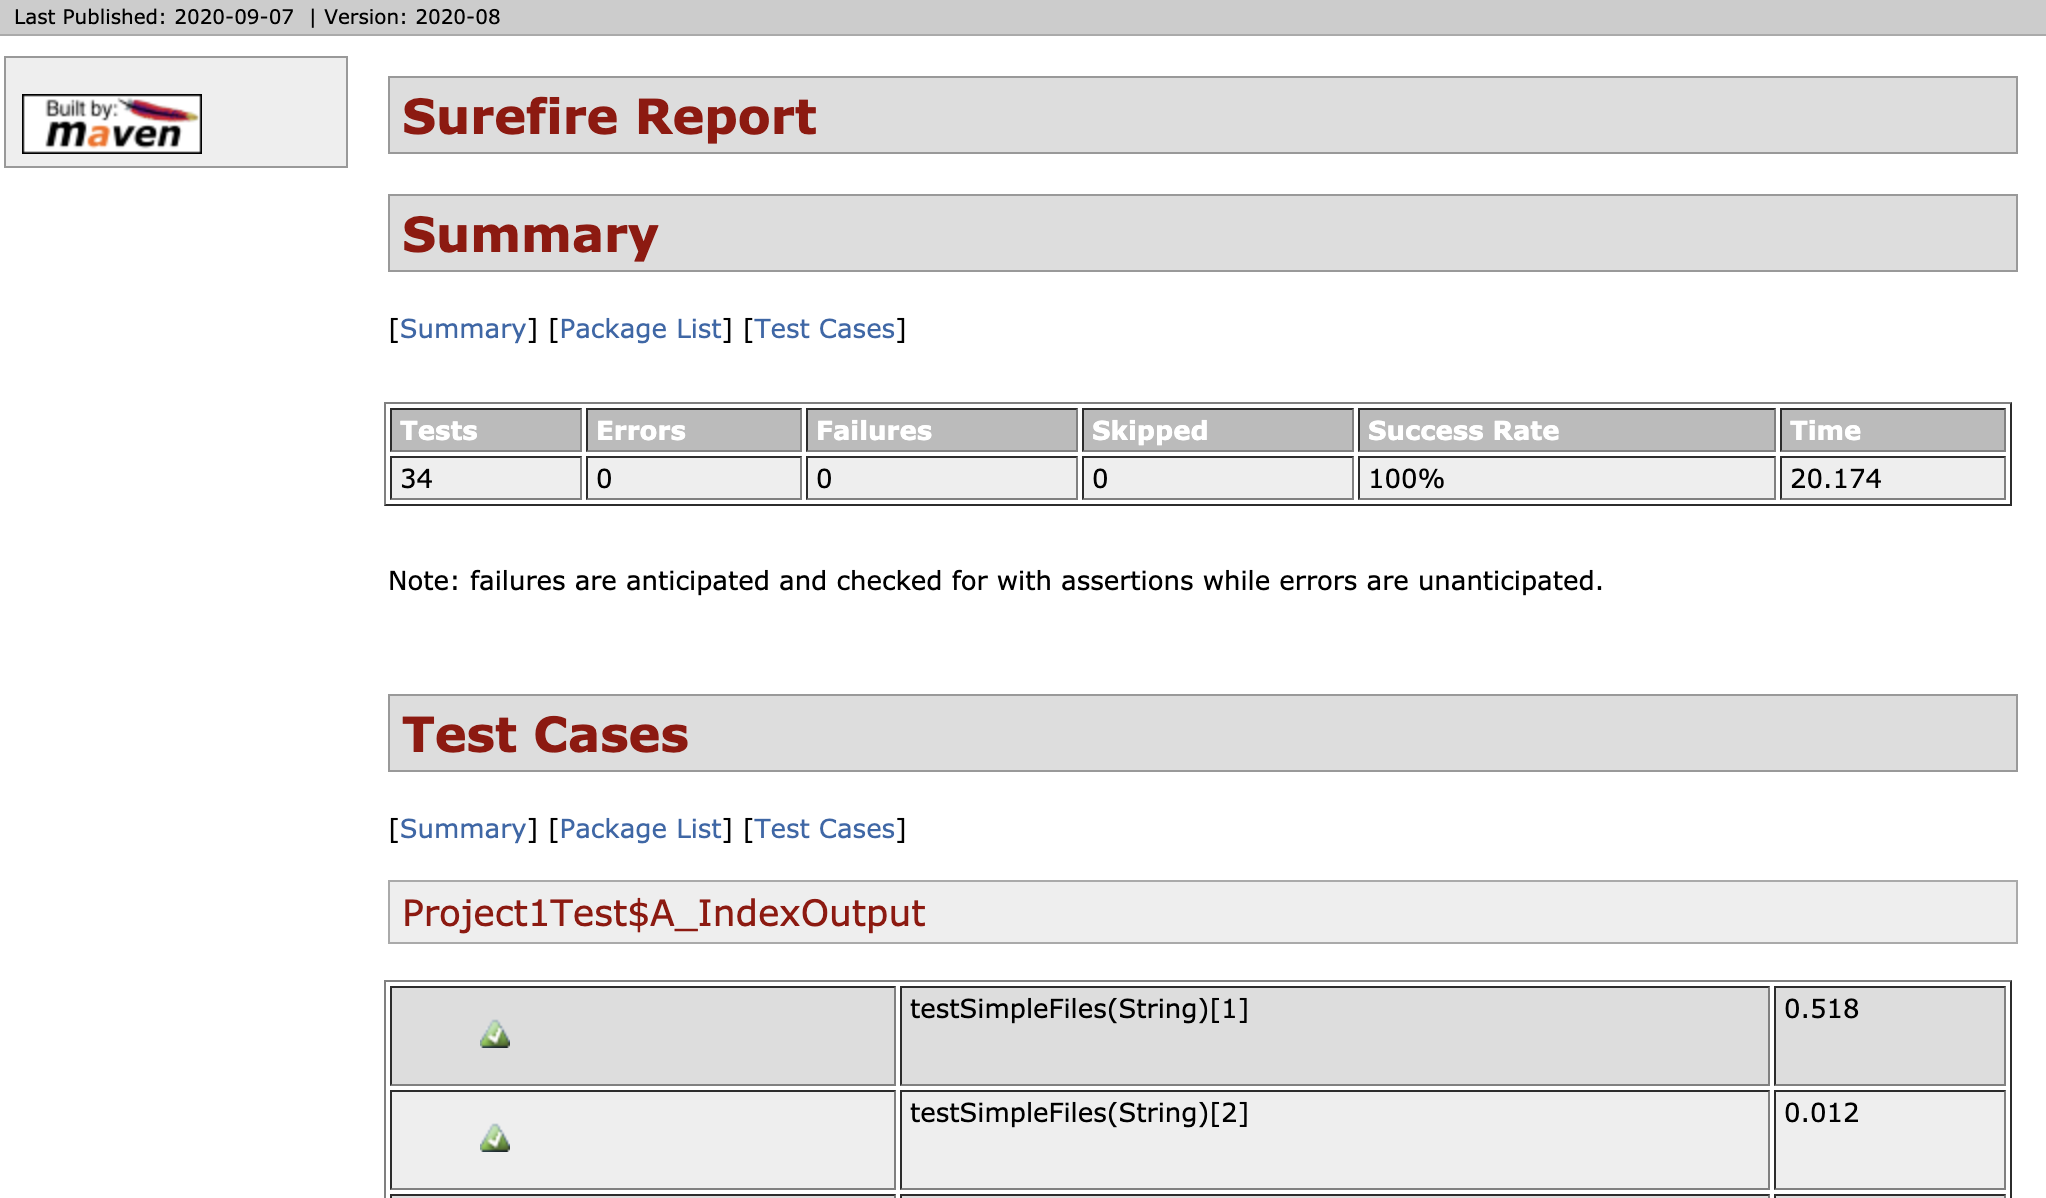
There are also raw text reports that have additional information, such as:
-------------------------------------------------------------------------------
Test set: Project1Test$A_IndexOutput
-------------------------------------------------------------------------------
Tests run: 26, Failures: 0, Errors: 0, Skipped: 0, Time elapsed: 10.001 s - in Project1Test$A_IndexOutput
However, the raw logs will have the most information. You can download those logs from the action run details (click on the second “Verify Project” link).
Outdated Verification Script
If the verification action fails with the message, “Your Github Action verify.yml is out of date,” then you need to push the latest version to your repository before you can continue.
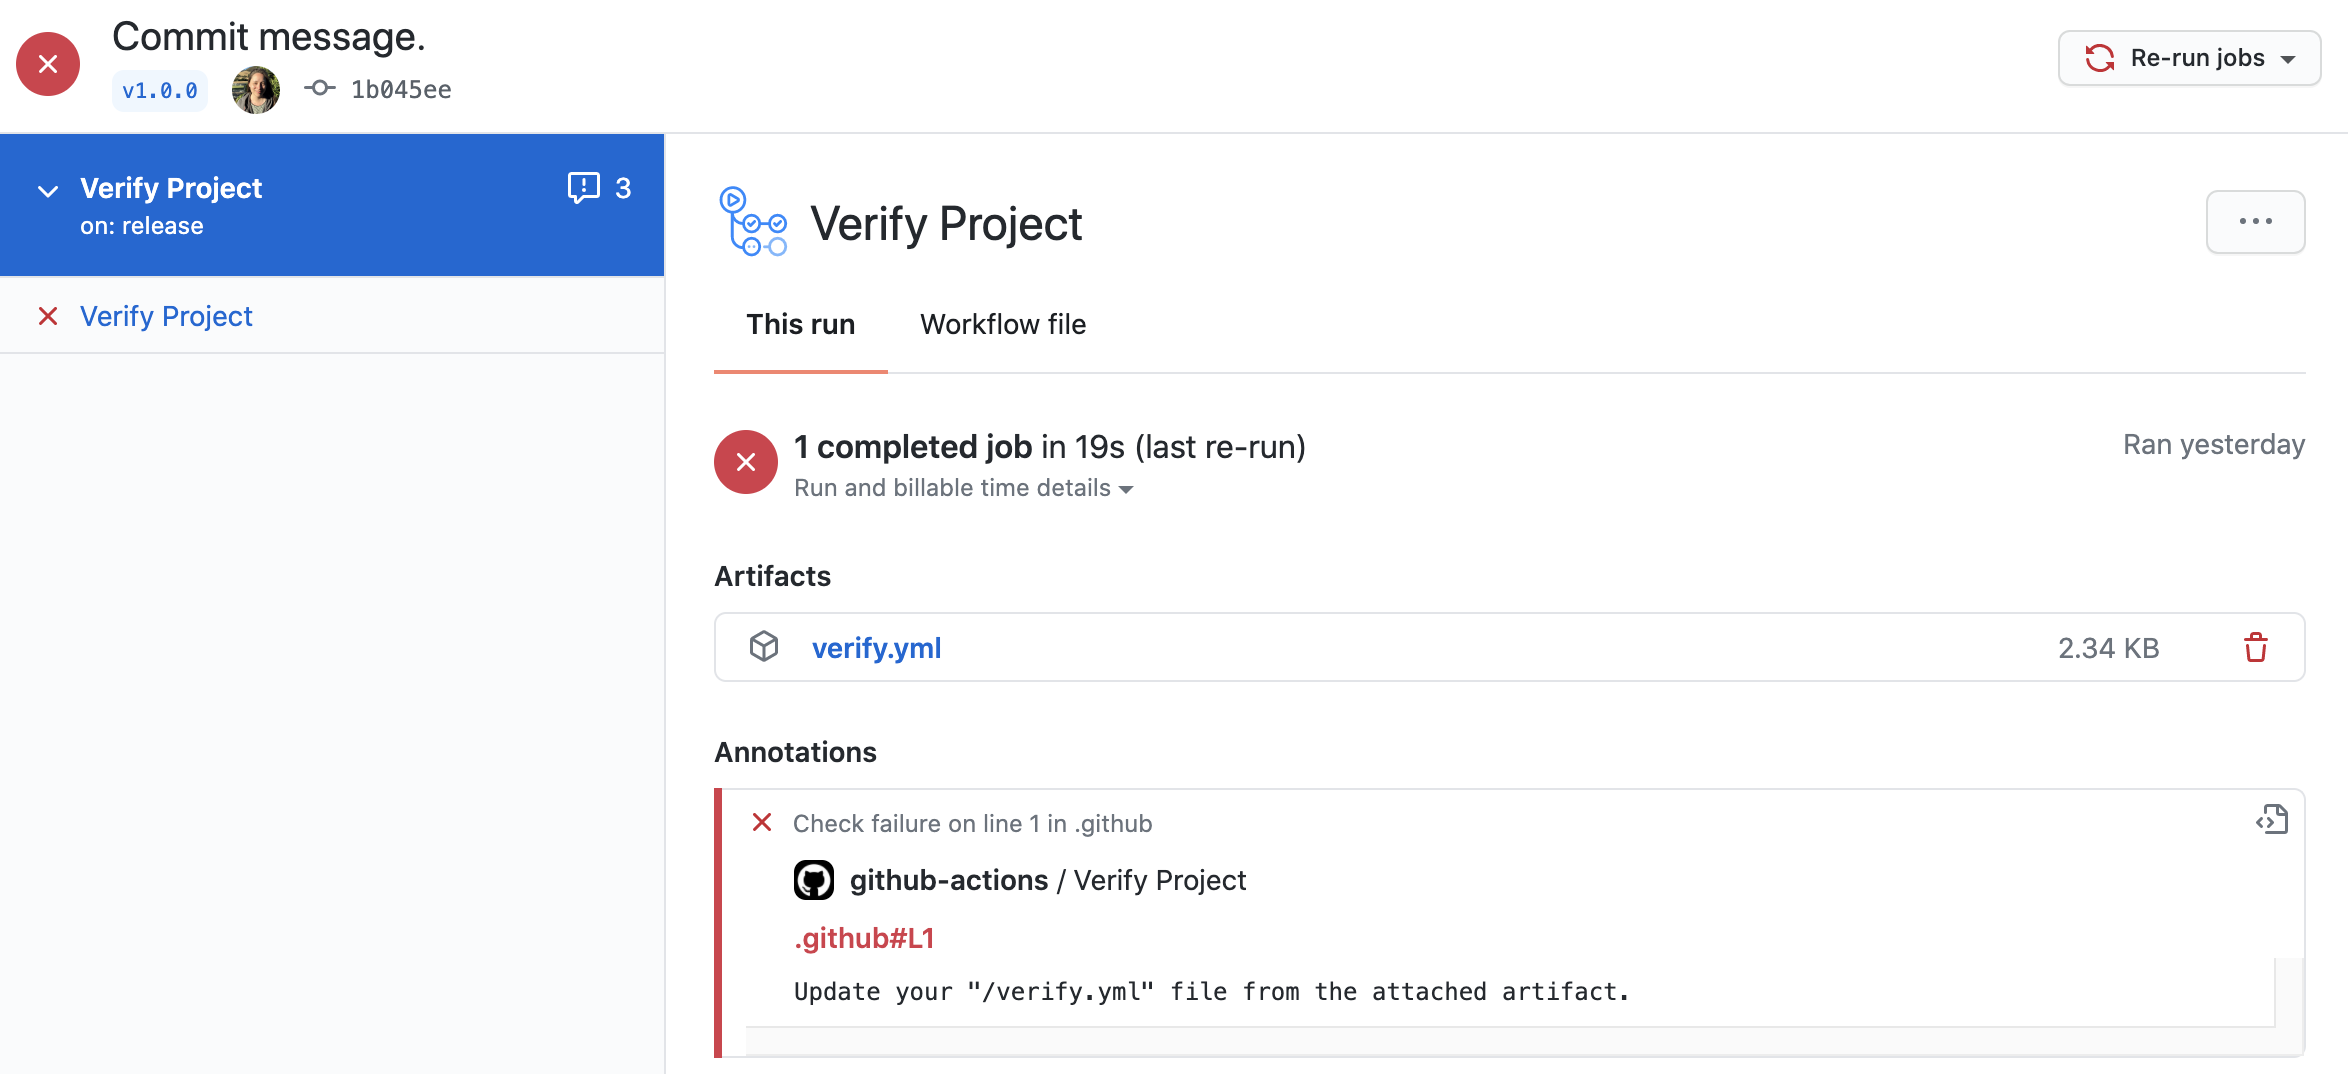
The latest version will be included under the “Artifacts” section (see above). Download that file and place it in the .github/workflows folder of your repository. You might need to show hidden files on your system to see the .github folder.
Push the changes to your repository. Once that is done, click the “Re-run jobs” button near the top right corner (see above). If this fails again, try creating a new release. This should trigger the Github Action to run again with the latest version.